I did it again… I installed NixOS as my host Operating System.
“Didn’t you already try that in the past? Are you crazy?”
You are right, I had previous track experience and it was not great. I really liked the idea of having a reproducible operating systems, ideally with modular components I can tweak based on the machine or the current situation. My first run I quickly grew tired of the nix functional programming language. Anyway, let me cook.
“Why are you doing this to yourself?”
I recently bought a new laptop: the Lenovo ThinkPad T15 Gen 5 AMD and my first thought was: “I really hate I have to migrate all my programs and configurations, it is going to take forever”.
After digging up a little bit I was able to discover many amazing content creators and fellow nix hackers (such as IogaMaster, vimjoyer and Misterio77) putting out great introductory content on the nix topic.
Being honest, there are many reasons, some listed below in the Nix introduction, but the following must be the biggest:
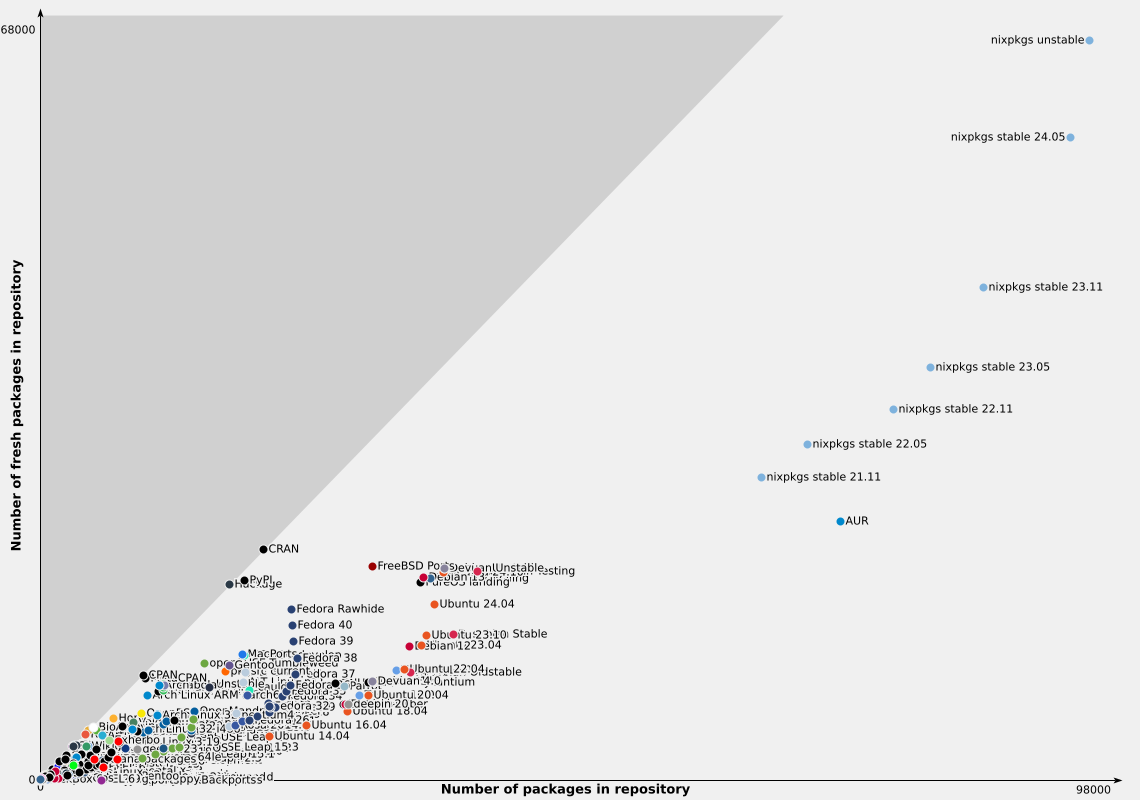
repology.org chart of number of fresh packages in repository
And so the adventure starts: what should have been a one or two-day job installing the latest Ubuntu turned into weeks of unpaid labor on the NixOS path. Our foolish hero’s fate was sealed!
Initially, I wanted to divide this blog in two parts:
- Installation writeup
- ThinkPad specific tweaks
Unfortunately, at the moment I do not have the time (“I bet with that shit OS LOL”) to write the first part. Thus, I will give a short introduction on NixOS and then go straight to the tweaks I developed to make my life on this planet less miserable.
If you are interested in NixOS, refer to the people I cited above (IogaMaster, vimjoyer and Misterio77), they provide amazing content in form of code on GitHub and videos explaining the thought process and details. You can also find a lot of articles online about Nix. Be curious!
Tip
The source code related to this blog is available here
What is Nix?
If you are familiar with Nix and NixOS, feel free to skip this section.
Nix is a powerful package manager and system configuration tool that brings a unique approach to managing software. It aims to provide reproducibility, reliability, and flexibility in the world of package management and system configuration. Unlike traditional package managers, Nix uses a purely functional model where software packages are built in isolation and stored in unique directories.
In fact, when you want to change your system in Nix, the canon way to do that is by modifying its declarative system configuration file and rebuilding the system with nixos-rebuild. Nix’s declarative configuration language allows users to describe their entire system setup, making it easy to reproduce environments on different machines.
However, Nix’s strengths come with a learning curve. Its unique approach requires users to adopt a new mindset, which can be challenging for those accustomed to traditional package management. The initial setup and configuration can be time-consuming, especially for newcomers. Additionally, while the Nix community is growing, it is still smaller compared to more mainstream systems like Debian or Red Hat, potentially making it harder to find support or documentation for specific issues. Despite these hurdles, Nix offers a compelling solution for those seeking robust, reproducible, and flexible package management and system configuration.
Nix shell for this blog
Once the basic NixOS was setup, I needed a Hugo installation to be able to work on this blog. I think this example is a good example to think about the differences of a traditional Linux distribution and Nix. In a traditional distribution (such as Ubuntu or Arch Linux), you usually have the following alternatives:
- Download the stable version from the official distribution’s repository
- Download the unstable version from the official distribution’s repository (PITA)
- Download the latest binary release from GitHub
- Download and compile the source code
- Other binary redistribution solutions (
Docker,flatpack,snap)
On Nix, you have the following alternatives:
- Install the latest stable version system-wide or in
nix-env - Install the latest unstable version system-wide or in
nix-env - Install any specific version system-wide
- Download and compile the source and provide the results system-wide or in
nix-env - Download the latest statically compiled binary release from GitHub
- Other binary redistribution solutions (
Docker,flatpack) - Temporary install the stable or unstable version in
nix-shell - Pin a specific version using
nix-shell
It is worth noting that in NixOS, by default, it is not possible to run dynamically linked binaries (if you wish to do so, look into nix-ld).
Since I recently started using GitHub Actions to deploy this blog, I decided to use the last option and pin my local version with the one used on the CI/CD. Thus, I tried to create a nix-shell pinning the nixpkgs to retrieve the desired hugo version.
A Nix shell is nothing more than a Nix file which will result in a custom environment, usually providing specific binaries, scripts and build artifacts.
I started by searching for the nixpkgs commit hash for specific hugo version (0.129.0) using nixhub:

nixhub.io hugo search providing commit hashes
Then, the nixpkgs archive url was composed as:
https://github.com/nixos/nixpkgs/archive/4f02464258baaf54992debfd010a7a3662a25536.tar.gz
Thereafter, the sha256 hash of the nixpkgs commit was calculated from the archive url:
$ nix-prefetch-url --unpack https://github.com/nixos/nixpkgs/archive/4f02464258baaf54992debfd010a7a3662a25536.tar.gz
path is '/nix/store/yvw0gysp31bb89c4j7rfbzv7f3ldvj00-4f02464258baaf54992debfd010a7a3662a25536.tar.gz'
0sq1fwqqmy7k2a4kvxp6nv3763xi9c29ldzqnwg78d9i6v1fkl2h
With this hash, all needed information was retrieved. Thus, I created the following shell.nix file:
# Pin hugo versions
# https://nixos.wiki/wiki/FAQ/Pinning_Nixpkgs
{ pkgs ? import (builtins.fetchTarball {
  name = "nixos-unstable";
  # Find commit hash using https://www.nixhub.io
  url = "https://github.com/nixos/nixpkgs/archive/4f02464258baaf54992debfd010a7a3662a25536.tar.gz";
  # Hash obtained using `nix-prefetch-url --unpack <url>`
  sha256 = "0sq1fwqqmy7k2a4kvxp6nv3763xi9c29ldzqnwg78d9i6v1fkl2h";
}) {} }:

pkgs.mkShell {
  nativeBuildInputs = with pkgs; [
    pkgs.hugo # v0.129.0+extended
    dart-sass # v1.77.6
  ];
}
Running hugo and dart-sass in nix-shell resulted in the desired versions:
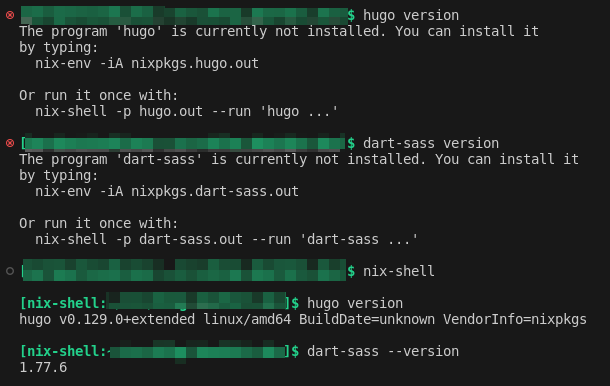
nix-shell providing a reproducible environment
The amazing thing is that you do not even need NixOS to use this. Yes, you heard that right! You can install Nix as a service and use this amazing feature in your favorite operating system! (MacOS is supported as well :P )
T14 ath11k_pci WiFi module breaks after hibernation
Tip
Source code is available here
One of the first thing I noticed once I started working on my new T14 was that hibernating and resuming from hibernation would result in the WiFi not working and in the following error:
kernel: mhi mhi0: Did not enter M0 state, MHI state: M3, PM state: M3->M0
kernel: ath11k_pci 0000:01:00.0: failed to resume mhi: -5
kernel: ath11k_pci 0000:01:00.0: failed to resume hif during resume: -5
kernel: ath11k_pci 0000:01:00.0: failed to resume core: -5
kernel: ath11k_pci 0000:01:00.0: PM: dpm_run_callback(): pci_pm_restore+0x0/0x110 returns -5
kernel: ath11k_pci 0000:01:00.0: PM: failed to restore async: error -5
Apparently, this is a common bug for this driver which is not easy to fix without a rewrite. Fortunately, a patch has been developed and it is on its way to the Linux kernel.
Many people had this problem before me. Thus, different way to solve this problem existed. Unfortunately, I was not able to find an easy fix in the Nix realm. One possibility would be to apply the patches before they hit the mainline kernel but since I am not rebuilding the kernel (yet), the best suitable alternative is to write two services to unload the ath11k_pci kernel module before hibernation and reload it on resume.
After a whole lot of tinkering (and thanks especially to vimjoyer and IogaMaster) I ended up with the following flake:
{ options
, config
, lib
, ...
}:
with lib;
with lib.antipatico; let
  cfg = config.services.t14-hibernate;
in
{
  options.services.t14-hibernate = with types; {
    enable = mkEnableOption "tweak to make hibernation work on t14 laptop";
  };

  config = mkIf cfg.enable {
    systemd.services.t14-hibernate-pre = {
      description = "T14 Hibernate Tweak (pre)";
      before = ["hibernate.target" ];
      wantedBy = [ "hibernate.target" ];
      serviceConfig = {
        Type = "oneshot";
        ExecStart = [ "/run/current-system/sw/sbin/rmmod ath11k_pci" ];
      };
    };

    systemd.services.t14-hibernate-post = {
      description = "T14 Hibernate Tweak (post)";
      after = ["hibernate.target" ];
      wantedBy = [ "hibernate.target" ];
      serviceConfig = {
        Type = "oneshot";
        ExecStart = [ "/run/current-system/sw/sbin/modprobe ath11k_pci" ];
      };
    };
  };
}
Please note that I am using the snowfall-lib library to swiftly import this into my Nix flake. In case you want to use this in a classical nix configuration, you can just extrapolate the systemd services out of the flake.
Using this flake, I was able to temporarily fix this bug, until the patched kernel comes out.
T14 microphone mute led always on
The microphone mute led button is a led placed in the F4 button which purpose is to stay on when the microphone is muted:

The microphone mute led button on a ThinkPad T490
Oppositely to some other implementations, in (current generations of) Lenovo ThinkPad the button is, as far as I understand, completely software controlled. In my working laptop, an old T490 running Ubuntu 22.04, the led works as intended and it is completely integrated within the Desktop Environment.
Unfortunately, that was not the case for me with NixOS 24.05 and my ThinkPad. This time, the Arch Linux wiki got my back only partially, providing enough information to identify the device but not enough to provide a full solution.
I was able to identify the device as /sys/class/leds/platform::micmute and echoing 0 or 1 into the brightness file successfully resulted in the led powering on and off. On the other hand, setting the trigger variable to audio-micmute did nothing (even though my DE was correctly toggling the microphone on and off).
Using amixer it was possible to get the device numid and thereafter its value (on/off):
$ amixer controls | rg 'Capture Switch;
numid=2,iface=MIXER,name='Capture Switch'
$ amixer cget numid=2
numid=2,iface=MIXER,name='Capture Switch'
  ; type=BOOLEAN,access=rw------,values=1
  : values=off
Trying to get the status as root broke when run as root:
$ sudo amixer cget numid=2
amixer: Control default open error: Host is down
Note
I was running this as root because I did not want to setup a rule with udev and setup a more complex permission on the hardware led interface. Thus, I was planning to create a service running as root.
My first thought was that the root user was missing some environment variable to access the user’s audio session (which in my case was pipewire). After a lot of searching and consulting with LLLMs, I was not able to find the right variable.
It was at that point, just before I was going to give up, that it stroke me: strace. Running strace both as user and as root, I was able to find the following syscalls:
$ strace amixer cget numid=2 |& rg pipewire
[...]
connect(17, {sa_family=AF_UNIX, sun_path="/run/user/1000/pipewire-0"}, 28) = 0
$ sudo strace amixer cget numid=2 |& rg pipewire
[...]
connect(12, {sa_family=AF_UNIX, sun_path="/run/pipewire/pipewire-0"}, 27) = -1 ENOENT (No such file or directory)

Mind = Blown
Searching the web again with this added information, I was able to find the PIPEWIRE_RUNTIME_DIR environment variable, which gave me the keys to the kingdom.
I ended up with the following script:
#!/usr/bin/env bash
# t14-micmuteled-update
LED_BRIGHTNESS="/sys/class/leds/platform::micmute/brightness"
DEVICE_ID="2"
AUDIO_USER_ID="1000"

MIC_STATUS=$(PIPEWIRE_RUNTIME_DIR="/run/user/$AUDIO_USER_ID" ${pkgs.alsa-utils}/bin/amixer cget numid=$DEVICE_ID | ${pkgs.ripgrep}/bin/rg -o 'values=(on|off)+' -r '$1')
[ "$MIC_STATUS" == 'on' ] && (echo 0 > "$LED_BRIGHTNESS")
[ "$MIC_STATUS" == 'off' ] && (echo 1 > "$LED_BRIGHTNESS")
Running this script as root, I was able to switch the led status to match the microphone status. Yay!
First version: acpid
Tip
Source code is available here
For this flake, I decided to go extra fancy and to create a derivation using writeShellScriptBin. For non-Nix user still tuning in, a derivation is a build specification that defines how to build and manage a package in the Nix package manager. Using Nix, I am able to create a service which depends on alsa-utils and ripgrep, while not exposing any of those packages content to the resulting system.
The result was the following:
{ options
, pkgs
, config
, lib
, ...
}:
with lib;
with lib.antipatico; let
  cfg = config.services.t14-micmuteled;
  script = pkgs.writeShellScriptBin "t14-micmuteled-update" ''
    #!/usr/bin/env bash

    LED_BRIGHTNESS="$1"
    DEVICE_ID="$2"
    AUDIO_USER_ID="$3"

    MIC_STATUS=$(PIPEWIRE_RUNTIME_DIR="/run/user/$AUDIO_USER_ID" ${pkgs.alsa-utils}/bin/amixer cget numid=$DEVICE_ID | ${pkgs.ripgrep}/bin/rg -o 'values=(on|off)+' -r '$1')

    [ "$MIC_STATUS" == 'on' ] && (echo 0 > "$LED_BRIGHTNESS")
    [ "$MIC_STATUS" == 'off' ] && (echo 1 > "$LED_BRIGHTNESS")
  '';
in
{
  options.services.t14-micmuteled = with types; {
    enable = mkEnableOption "tweak to make micmute led work on t14 laptop";
    ledBrightness = mkOpt str "/sys/class/leds/platform::micmute/brightness" "Path to the target led to control";
    microphoneNumId = mkOpt int 2 "numid for the microphone to monitor (find out using: amixer controls)";
    userId = mkOpt int 1000 "User id to select the right pipewire socket";
  };

  config = mkIf cfg.enable {
    services.acpid = {
    enable = true;
    # The following is useful if you are trying to develop your own solution
    #logEvents = true;
    handlers.t14-micmute = {
      event = "button/f20.*";
      action = ''${script}/bin/t14-micmuteled-update "${cfg.ledBrightness}" ${toString cfg.microphoneNumId} ${toString cfg.userId}'';
    };
    };
  };
}
Second version: Systemd service
Tip
Source code available here
The previous approach fails to detect mic mute status toggles caused by user actions through the GUI or third-party software, as the acpid-based solution overlooks these changes. I decided to rewrite it as a systemd service, which comes with its own downsides (such as a small lag and supposedly more power consumption) but better represents the real status of the microphone:
{ options
, pkgs
, config
, lib
, ...
}:
with lib;
with lib.antipatico; let
  cfg = config.services.t14-micmuteled;
  script = pkgs.writeShellScriptBin "t14-micmuteled-daemon" ''
    #!/usr/bin/env bash

    LED_BRIGHTNESS="$1"
    DEVICE_ID="$2"
    AUDIO_USER_ID="$3"
    SLEEP_INTERVAL="$4"

    OLD=""
    while true; do
      ${pkgs.coreutils}/bin/sleep $SLEEP_INTERVAL
      MIC_STATUS=$(PIPEWIRE_RUNTIME_DIR="/run/user/$AUDIO_USER_ID" ${pkgs.alsa-utils}/bin/amixer cget numid=$DEVICE_ID | ${pkgs.ripgrep}/bin/rg -o 'values=(on|off)+' -r '$1')

      [ "$MIC_STATUS" == "$OLD" ] && continue
      [ "$MIC_STATUS" == 'on' ] && (echo 0 > "$LED_BRIGHTNESS")
      [ "$MIC_STATUS" == 'off' ] && (echo 1 > "$LED_BRIGHTNESS")
      MIC_STATUS=$OLD
    done
  '';
in
{
  options.services.t14-micmuteled = with types; {
    enable = mkEnableOption "tweak to make micmute led work on t14 laptop";
    ledBrightness = mkOpt str "/sys/class/leds/platform::micmute/brightness" "Path to the target led to control";
    microphoneNumId = mkOpt int 2 "numid for the microphone to monitor (find out using: amixer controls)";
    userId = mkOpt int 1000 "User id to select the right pipewire socket";
    sleepInterval = mkOpt int 3 "Interval between each check (the higher the less power consumption, the more lag)";
  };

  config = mkIf cfg.enable {
    systemd.services.t14-micmuteled = {
      description = "ThinkPad T14 Mic Mute Led Tweak";
      after = [ "network.target" ];
      serviceConfig = {
        ExecStart = ''${pkgs.bash}/bin/bash ${script}/bin/t14-micmuteled-daemon "${cfg.ledBrightness}" ${toString cfg.microphoneNumId} ${toString cfg.userId} ${toString cfg.sleepInterval}'';
        Restart = "always";
      };
      wantedBy = [ "default.target" ];
    };
  };
}
Conclusion
So far my second NixOS experience turned out really positive. I am spending much time tinkering with my system, but I feel like all this effort will not be lost to the sands of time, at least not as easily as some random configuration made in dconf.
I hope you enjoyed it, feel free to drop a message if you need some help with your Nix configuration. Be aware I am still very n00b, but I will be happy to try to give some help!